Another Thanksgiving has come and gone. For only the 4th time in the last 25 years, I did not have to work in a professional kitchen feeding the masses - just a low-key 3 people this year. I have been fortunate that I was still able to join my family for a Thanksgiving meal most prior years, albeit at a table in the dining room of where I happened to be working. Delicious, but far from relaxing, or "enjoyable." Usually a few hasty mouthfuls of food, interrupted by antsy glances around the dining room; far more concerned about what the diners at other tables and the service staff were doing than with enjoying the company of my family or my meal.
Needless to say, this year I was able to relax and enjoy the day. And as I didn't have to worry about keeping the various "plates spinning," as required by running a restaurant, I was able to focus on the holiday and my family for a change of pace. In my pain au chocolat induced meditative state what this year's Thanksgiving really meant, hit me.
From 2006 until last spring, we had lived in northern New Hampshire, in what can only be described as the quintessential New England ski town...and in the heart of the New Hampshire ski industry. In addition to working on the holiday, Thanksgiving had been THE day of transition; from little rural town to bustling, throbbing ski town. I would spend the next 4-1/2 months working well in excess of 90 hours per week to feed those masses of skiers. My wife would work 7-days a week until the first weekend of April coaching budding ski racers. It was an exaggerated version of fishing-while-the-fish-are-biting resulting in not seeing family members for days on end.
We put our family on hold for the entire winter.
But this year is different. For the first time in her life, my daughter has me around on the weekends, (much to her pre-teen chagrin, I assure you). My wife has days off. We eat dinner together, as a family, almost every night of the week. I feel like an active participant in my family...not just a lodger or occasional visitor.
And for that I am truly grateful.
Saturday, November 28, 2015
Friday, July 17, 2015
Pickled and Fermented Fennel with Cherries

These pickles evolved from the latter: somebody's shopping cart was bigger than their menu.
This method uses a combination of Sandor Katz's "sauerkraut method" (salting and pressing vegetables for lacto-fermentation) and vinegar pickles, and is super easy to prepare. The hardest part of pickling is waiting for them to be ready!
Fennel-Cherry Pickles
1 tsp. Whole coriander seeds
1 tsp. Whole mustard seeds
1 Tbsp. Whole fennel seeds
1 pound Dark or Rainier cherries; stems removed, pits removed, and halved
1/2 head Fennel; cored and sliced thinly (stalks and fronds included)
2 Tbsp. Kosher salt
1/4 Cup Sugar in the Raw
as needed Bragg's Cider Vinegar (optional)
Place whole coriander, mustard, and fennel seeds in a small skillet; toast over medium heat, shaking the pan every few seconds, until the aroma of fennel is apparent. Remove from heat and let cool.
While the spices are cooling combine the cherries, fennel, salt and sugar in a non-reactive bowl and toss to thoroughly distribute the salt and sugar. Add the dried spices and mix again. Transfer to a non-reactive container. Using your hands press down on the mixture until it releases enough liquid to cover the mixture, (much easier than it sounds, you will want to "crush" and mash the mixture a little). Cover with cheesecloth, or a clean-breathable cloth, and leave for an hour; after an hour if the fennel-cherry mixture has not released enough liquid to cover, top off with a little distilled water. Cover the container with the cheesecloth/clean cloth again, and secure with a rubber band. Let the fennel-cherries stand at room temperature for 2-3 days, or until bubbles start to form (this is good. That means the lacto fermentation is going strong and producing CO2)
After this initial fermentation, taste your pickles (use a clean utensil to remove the pickles from the container, lest you introduce bad bacteria into you pickles). If you are happy with the flavor, transfer to a clean container and cover tightly; refrigerate for 2-4 weeks or pressure can for long-term storage.
If you want to go "funkier" replace the cloth cover and let stand until you are happy with their flavor (using the prescribed method for taste testing above). When you feel they are ready, cover-refrigerate, or can for storage.
This is delicious served with chili rubbed and grilled pork.
NOTE: you can adjust the acidity with apple cider vinegar, but is not neccessary
In a pickle...
Much to my delight my employer came to me last week with the request that they would like to eat more fermented foods. While I am no Sandor Katz, fermented foods are my jam (so to speak). And as luck would have it, I was bequeathed several bags of heirloom tomatoes and cucumbers fresh from the garden less than 24 hours earlier.
First thought: Ma' Beers' Pickles. Sweet and sour pickles, (think bread and butter pickles with more spices and depth of flavor), that I have been making professionally for over a decade.
Done.
Then the tomatoes. I had planned on making a salad or roasting/dehydrating them, and then I thought, "why not pickle them, too?" So I embarked upon the pickling process only to find that my vinegar supply was woefully low (I like to use rice wine vinegar to pickle tomatoes). At this point it became a "mystery basket" competition, assessing what foodstuffs I had at my disposal and creating something delicious. I realized that I had a couple of scallions that needed to be used up, as well as a piece of fresh ginger, and a tub of organic shiro miso. Time to create my improv version of the traditional Japanese pickle: misozuke.
While ginger-miso-tomatoes may sound a little out there, the results are delicious. And with the onset of tomato season, everyone needs a way to process those excess fruits of summertime. And these are K.I.S.S easy to make.
Improv Misozuke
1-1/2 pounds tomatoes, washed, cored, and medium-diced (about 4 cups)
2 each scallions, sliced thin (about 1 cup)
1/4 cup shiro miso
2 Tbsp sliced-peeled ginger root (about a 2" piece)
pinch crushed red chili flakes
Place all ingredients in a non-reactive container and mix to thoroughly combine. Press down on the vegetables and make sure they are submerged below the miso/liquid that is in the container; use a clean towel to clean the sides of the inside of the container (to prevent any spills from becoming moldy). Cover the container with cheesecloth (or breathable clean cloth) and secure with a rubber band or twine; place in a dark cool place (mine were kept at 76F) for 2-3 days or until bubbles are starting to form at the surface. At this point remove the cheesecloth and cover the container; the pickles can be stored in the refrigerator for 2-4 weeks or canned for longer storage.
NOTE: you can also skip the fermentation process if you prefer; miso-tomato salad is delicious too, warm or cold
First thought: Ma' Beers' Pickles. Sweet and sour pickles, (think bread and butter pickles with more spices and depth of flavor), that I have been making professionally for over a decade.
Then the tomatoes. I had planned on making a salad or roasting/dehydrating them, and then I thought, "why not pickle them, too?" So I embarked upon the pickling process only to find that my vinegar supply was woefully low (I like to use rice wine vinegar to pickle tomatoes). At this point it became a "mystery basket" competition, assessing what foodstuffs I had at my disposal and creating something delicious. I realized that I had a couple of scallions that needed to be used up, as well as a piece of fresh ginger, and a tub of organic shiro miso. Time to create my improv version of the traditional Japanese pickle: misozuke.
While ginger-miso-tomatoes may sound a little out there, the results are delicious. And with the onset of tomato season, everyone needs a way to process those excess fruits of summertime. And these are K.I.S.S easy to make.
Improv Misozuke
1-1/2 pounds tomatoes, washed, cored, and medium-diced (about 4 cups)
2 each scallions, sliced thin (about 1 cup)
1/4 cup shiro miso
2 Tbsp sliced-peeled ginger root (about a 2" piece)
pinch crushed red chili flakes
Place all ingredients in a non-reactive container and mix to thoroughly combine. Press down on the vegetables and make sure they are submerged below the miso/liquid that is in the container; use a clean towel to clean the sides of the inside of the container (to prevent any spills from becoming moldy). Cover the container with cheesecloth (or breathable clean cloth) and secure with a rubber band or twine; place in a dark cool place (mine were kept at 76F) for 2-3 days or until bubbles are starting to form at the surface. At this point remove the cheesecloth and cover the container; the pickles can be stored in the refrigerator for 2-4 weeks or canned for longer storage.
NOTE: you can also skip the fermentation process if you prefer; miso-tomato salad is delicious too, warm or cold
Saturday, March 22, 2014
Spring is around here somewhere
![]() |
Veal shell steak cooked in hay, with pan fried gnudi, half-sour pickled asparagus, chanterelle mushrooms, crispy onions, and bacon glace |
So this morning as I slid down the icy hill in our parking lot at work, I had no idea that I would inspire myself, or have an epiphany of any sort today. Just an average, late winter/early spring day that feels much more like Winter, than Spring. As we started preparing for this week's menu, all I could think was,
"Man! I wrote some menu items with no vibrancy in color..."
Which was the exact opposite of what I tried to do: my theme to this weekend's menu was "wishful thinking" when I wrote it. And I wanted to capture the vibrancy and essence of Spring. Heading into lineup, all I could picture in my head was these plates full of drab, dull colors...
And then the moment of truth...
The first plate was mushroom ravioli with mushroom broth, chanterelle, shiitake, and white beech mushrooms, roasted zucchini-sunflower seed pesto, aged gouda, and pea shoots.
It was f*@king delicious...and monotone...and looked like the first shoots, and runners of Spring emerging from the slowly warming earth. "Neat," was all I could think to myself..."maybe I didn't miss the mark by too much."
Then the bone-in veal strip steak pictured above. A plate of ocher and earth-tones, and muted green asparagus, (from the pickling).
Snap a picture.
Move on to the next plate.
But, as I stared at the picture which I initially HATED it started to grow on me...
In fact, I think that I have inadvertently captured Spring! Ocher and earth-tones representing the recently exposed earth, revealed by the melting snow. The onions and the mushrooms are like the fallen leaves from last autumn that remain on the ground. And the asparagus, not quite the bright green of spring, but still muted as if it was just emerging from its long winter's nap and pushing its way up through the leaves on the forest floor.
So despite my missing my intended target of a "Spring menu," I may have come closer than I thought. My attempt to capture the changing of the season was successful on a much more subtle level than my usual ham-fisted way: conceptual more than literal.
Another season. Another corner turned.
Tuesday, December 24, 2013
Best Brussels Sprouts. Ever.
I refer to these as the "Brussels sprouts for people who hate Brussels sprouts." Sweet and sour. Smoky and funky, with a punch of umami if you choose to add the fish sauce. This is a great basic preparation that lends itself to endless improvisation, (add shallots, chiles, apples...)
Caramelized Brussels
Sprouts with Bacon
Serves 4 as a side dish
1 pound Brussels
sprouts, halved
Kosher salt
3 tablespoons butter
1 tablespoons apple cider vinegar
3 tablespoons maple syrup
1 tablespoon fish sauce (optional)
8-10 slices crisped bacon,
crumbled
freshly
ground pepper
Bring 3-quarts of salted water to a
boil; blanch the Brussels sprouts for about 2 minutes in the boiling water;
drain and shock in cold water.
Melt 2 tablespoons butter in a
skillet over medium-high heat; add blanched Brussels sprouts and cook, stirring
frequently until the spouts begin to brown, (about 5 minutes). Deglaze the pan with the vinegar and reduce
until almost gone; add maple syrup and fish sauce and reduce, stirring
frequently, until the syrup has thickened and coats the Brussels sprouts.
Just before serving add the
remaining butter, and crisped bacon.
Adjust seasoning with salt, pepper and any additional vinegar or maple
syrup.
Sunday, December 22, 2013
All I want for Christmas is...
Many years ago I was asked to contribute to an article regarding what chefs prepare for the families/eat for Christmas. I’m sure that at the time, I composed some God-awful list of “fancy” and “gourmet” foodstuffs that I would be embarrassed to publish now. [Give me a few days to dig and I will start the holiday season shame spiral myself by putting it online]
Years later I realized that my Christmas family meal was the one shared with my team members; a group of people from greatly varying social, economic, ethnic, and religious backgrounds all brought together by the common bond of food.
Now I have come to reckon that all of my food wishes for the holidays were forged in the crucible of central New York: I always associate Christmas Eve with Italian food [Feast of the Seven Fishes}; December, 24 remains one of the only days of the calendar that I intentionally cook a menu with an Italian focus.
Christmas…definitively shaped by my two grandmothers: one who cooked from a straight-up Victorian English cookbook, and the other who was Southern and cooked from the 1950’s and 1960’s standard repertoire of American cuisine. So what do I cook now?
Appetizers:
You really can’t go wrong with shrimp cocktail, (I have a major soft spot for the kind with little salad shrimp tossed with cocktail sauce and served on a bed of shredded iceberg lettuce), cheese, vegetables and dips, fruit, relish trays, olives, pickles, salads…cold/finger foods work the best because they can be done ahead of time, no additional cooking is required when guests are in house and everyone can help themselves.
Main Course
I am a big fan of the roast beast: ham, goose, venison, beef, turkey…again, items that can be seasoned and cooked ahead of time with little to no extra work needed except for carving the meat to serve it.
Side Dishes
While this is where I take the most liberties with tradition, I still refrain from straying too far from tradition. [The tradition I keep referencing is my/my family’s tradition, and not some worldly ideal]
My memories are of a dinner table brimming with family favorites and seasonal bounty from the local store, (creamed pearl onions, anyone?) I really like to keep it simple here too: roasted root vegetables, caramelized Brussels sprouts with maple syrup and bacon, glazed carrots, mashed potatoes, pureed celery root, or sweet potato souffle. All prepared ahead of time and bunged in the oven to cook or reheat for Christmas dinner.
Desserts
I will forever associate cheesecake with the holidays, (my grandmother’s recipe made too much batter for “her cheesecake pan” and she subsequently would bake the extra batter in a small loaf pan…which became MY cheesecake). I also love eggnog…so I have started making an eggnog flavored cheesecake as of late…
This year I am serving warm gingerbread with whipped cream, (thick ginger cake…not gingerbread cookies), no-bake eggnog cheesecake with graham cracker streusel, and dark chocolate mousse with candy cane crunch at the hotel.
As I wrote this I realized the irony: for a chef who proclaims to “hate repeating dishes” I sure do cook the same thing year in, and year out for holiday meals. I really do feel that tradition is more important than innovation when bringing family together; that is not to say that you can’t put interesting wrinkles into tried and true favorites, (candied ginger-cranberry sauce).
My only advice is to make simple and delicious food, taste and season/re-season your food as you go, and enjoy the time spent with friends and family.
Have a cool Yule...log!
In honor of the ancient festivities known as "Yule"...which begin on the Winter Solstice to celebrate the return of increasing daylight, and interestingly lasts for twelve days...
When asked for a
holiday dessert that is really unique to Christmas, I really had to search the
old memory banks for something kind of distinctive. Then it came to me while contemplating the
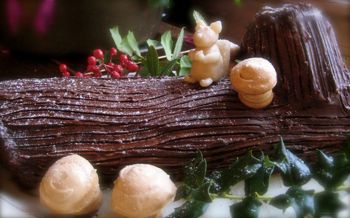
accent over the e in “bête”: “Bûche de Noël”…or kindly translated to English, a
Yule Log!
As I rifled through old
papers to find my recipe, I recalled the fact that this was, in fact, the first
“complicated” pastry I ever made, (as a project for my seventh grade French
class). As I reviewed Mm. Agati’s recipe
sheet, I stumbled upon the history of the “Yule log”:
“In pre-Christian Scandinavia , large bonfires were burned during the Jul
(Yule) festivities, which honored the God Thor and celebrated the winter
solstice. As Christmas replaced Yule
celebrations, the yule log no longer carried religious significance, but it
still carried the traditions and superstitions associated with it.
In France , the log
was to be cut only by the male members of the family, and was never cut or
supplied by someone outside of the household.
Much pomp and circumstance surrounded the lighting of the Yule log,
including singing and the pouring of wine over the log before it was lit. Once lit, the log was used to cook Christmas
Eve supper. Ashes from the burned log
were believed to have special powers, ranging from healing, to promoting crop
growth, to increased fertility!
When, in time,
fireplaces and logs became scarce in larger French cities, the practice of
baking log shaped cakes was begun, to allow those without a fireplace to carry
on the tradition.”
While this hasn’t been
a tradition in my house in some years, I hope that it may be included in your
family’s Yule celebrations this year.
Yule Log
(Bûche de Noël)
Yield: 1 Yule Log
SPONGE:
1 EA egg
white
5 OZ./ almond
paste
6 EA eggs,
separated
5 OZ/ granulated
sugar
½ tsp. vanilla
extract
2 OZ/ cake
flour
1
½ OZ/ unsweetened
cocoa powder, sifted with the flour
FROSTING:
4 OZ sweet
butter, at room temperature
4
OZ plain
or butter flavored Crisco
8 OZ confectionary
sugar
8-10 OZ sweet
dark chocolate, melted, and warm to the touch
FOR
DECORATION:
Marzipan holly
berries and leaves (optional)
Melted
sweet, dark chocolate (optional)
Confectioner’s
sugar
1).
Pre-heat oven to 425°F. 2). Gradually
mix the egg white into the almond paste to soften it. 3). Whip the egg yolks with 1/3 of the sugar
until thick and ribbony. Add the vanilla. Very slowly, add the egg yolk mixture to the
almond paste; if you add it too fast you will get lumps. 4). Whip the egg whites until foamy and
gradually add the remaining sugar. Whip
the whites to stiff peaks. 5). Sift the
flour and cocoa together. Carefully fold
the egg whites into the egg yolks. Fold
in the dry ingredients. 6). Immediately
spread the batter onto a baking paper-lined 9”x11” jellyroll pan, taking care
not to “overwork” the batter. 7). Place
the sponge in the pre-heated oven and bake for 8 minutes, or until the cake
springs back in the middle when lightly pressed. Dust a piece of baking paper with flour and
invert the cooked sponge on top, (this prevents the sponge from overcooking and
becoming dry). Let cool. 8). While the sponge is cooling, place the
butter and shortening in a mixing bowl, and whip with an electric mixer until
combined and there are no visible lumps.
Gradually add the sugar and continue whipping until the frosting is
light and fluffy, (it will double in volume and become very white). Place 1/3 of the buttercream in a separate
bowl, and quickly mix in the melted chocolate.
Still working quickly, add this back into the remaining buttercream. 9). Once the sponge is cooled and the
frosting complete, spread approximately 2/3 of the frosting over the sponge,
leaving a ½” border on the short sides, and a 1” border on the long side of the
sponge closest to you, (or else the frosting will ooze out the sides as you
roll it). Roll the sponge like a
jellyroll starting with the top long edge, working towards you, using the paper
to help you. 10). Remove the paper, and
refrigerate the rolled sponge, seam side down, and covered until the
buttercream is firm. 11). Once the
frosting is firm, cut off 2 ½ inches from one end of the log, and attach the
“branch stump” to the log with some of the remaining buttercream. Proceed to frost the sponge-roll to resemble
the bark of a log. At this point you can
just sprinkle powdered sugar over the log to resemble snow and prepare to eat
your very own Bûche de Noël, or you can get fancy and decorate with marzipan
berries and leaves, (available from most reputable bakeries), and create bark
patterns and wood grain with the melted chocolate. Joyeux Noël!!!
Subscribe to:
Posts (Atom)